Display/Edit Location: Help
Every location that is referenced by an event or fact in the Family Tree is recorded in the Locations master table. This way all of the information collected about a particular location is centralized. This, in particular, facilitates ensuring that particular locations are always identified in the same way. If you change the location name then all events referencing that location are changes.
You get to this web page by clicking on the link on the numeric key field on the Locations Master List web page, or by clicking on the button in the popup that appears if you hold the mouse over a location name. It also appears if you click on the button associated with a vital records registration office in the Edit Townships dialog.
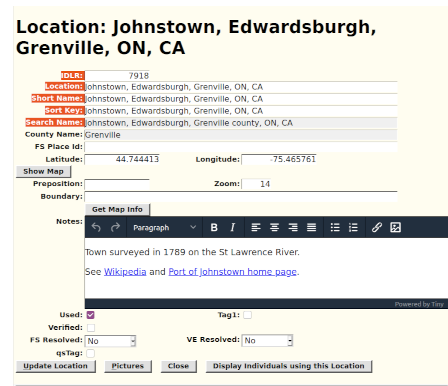
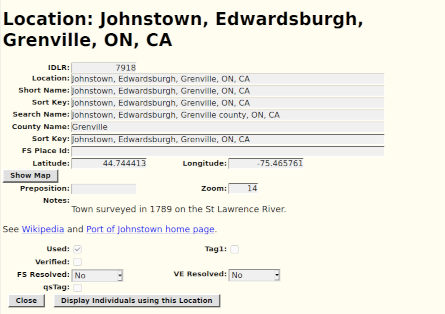
If you are signed on as a contributor the text and other fields on this page permit you to modify the characteristics of the location as shown above. Otherwise the fields are all protected as shown below.
The following information is displayed:
- The unique internal numeric key of the location record. This is required to support having multiple locations with the same name.
- The location name as it appears in reports. The only way to modify the appearance of the name is through this field. In particular if you attempt to change the case of any letters in the location name as it appears in the description of any fact that change is ignored. If you make any more substantive change to the location name in a fact, for example expanding an abbreviation, you create, or refer to, a new location, distinct from the original.
- The short name is used only on input. If you enter a short name when editing a fact it is expanded to the full location name. For example you could define "Chicago" as a short name for the location "Chicago, Illinois, USA".
- The sort key is normally the same as the location name, but can be used to change how the location names are present in the locations master list. For example if you define "Saint Louis, Missouri, USA" as the sort key for "St Louis, MO, USA" then the location will sort in a more intuitive way. Lot numbers both in the country and on city streets are moved to the end of the sort key and padded with zeroes so that all of the locations on the same street or in the same concession sort intuitively
- The search name is used when performing a geo-location search to obtain the longitude and latitude of the location.
- FS Place Id is not currently supported, but may be set for use by Legacy Family Tree software.
- The Latitude and Longitude of the location. These values are shown and entered in degrees with decimal fractions. These fields are normally set by manipulating the map displayed by the button.
- Clicking on the button pops up a map based on the supplied longitude and latitude, or if those have not yet been determined the Google maps geo-coder is used to attempt to interpret the name of the location. You can manipulate this map to focus on the actual location based upon your knowledge. See Manipulating the Map below for further details.
- The preposition field permits explicitly defining the preposition used before the location name in reports. The default is "at" but, for example in English the preposition "in" is normally used with geographically extensive locations, such as countries, states, provinces, and counties.
- The Zoom field is used to determine the area covered by the map displayed by on the button. The higher the value, the smaller the area. Level 1 shows the entire world. Level 12 covers a whole township or medium sized city. Level 20 shows an individual house. This field is normally set by manipulating the map displayed by the button.
- If you are authorized to update locations the Boundary field contains the latitude and longitude coordinates of the vertices of a polygon which encloses the location, or a line which traces out the
- If you are authorized to update locations you will see either a Stroke row or a Region row. If you see a Region row then the value of the Boundary field is treated as a polygon enclosing the area of the location. For example a Township has a boundary around the area of the Township. The Region row contains a button. Clicking on this button replaces the Region row with a Stroke row. If the Stroke row is present then the Boundary value defines the path of a line tracing out the location. For example a river or a street can be traced out by a stroke. The Stroke row contains a selection list of colours for the stroke. The Weight field specifies how wide the stroke is. If you change your mind and want the Boundary to be treated as the outside of a geographical region, you can click on the button.
- The button adjusts the values of latitude, longitude, zoom, and the boundary to correspond to the displayed map as you have manipulated it.
- The notes field can be used to explain the usage of a location or for any other purpose you choose. This is a rich text field so you can make text bold or italic, add bulleted or numbered lists, and paste in elements copied from a rich text document such as in a word processor.
- The "Used" flag is used by LegacyFamily Tree software.
- The "Tag1" flag is used by Legacy Family Tree software.
- The "Verified" flag is used by Legacy Family Tree software.
- The "FSResolved" field is used by Legacy Family Tree software. It has the values 0=no, 1=yes, 2=could not be resolved.
- The "VEResolved" field is used by Legacy. It has the values 0=no, 1=yes, 2=could not be resolved.
- The "qsTag" flag is used by Legacy Family Tree software.
- As a result of editing location names it may happen that two or more locations end up with the same Location text. This normally means that they are in fact two references to the same real location. When this occurs editing one of the locations results in the display of a list of all higher numbered locations with the same location text, together with a button. Clicking on this button merges all references to the higher numbered instances and deletes the higher numbered instances from the table.
- If you are authorized to update locations click on the to apply changes you have made to the fields.
- The button displays a list of individuals and events that reference this location. You cannot delete a location that has any events referring to it. To delete a location you first select this hyperlink. If there are no references you are given the option of deleting the location.
Manipulating the Map
Clicking on the button opens a view-port on a Google map. If you are not signed on to the site this looks like the following:

This shows what the map will look like when requested by a user of the site when examining an event in the Family Tree. The map is centered on the location. If the location is an extended area, such as a city, county, or township, then this displays the boundary with the interior shaded.
If you are signed on as a contributor then you are given the ability to modify the map by manipulating this display.
This has a marker identifying the center of the map. If this is not located on the most appropriate geographical position to represent the location name, use the mouse to drag the map so the desired position is in the center of the map window. Do this by holding down the left mouse button while you move the mouse. Zoom the map to the most appropriate level of detail using the '+' and '-' map controls in the lower right.
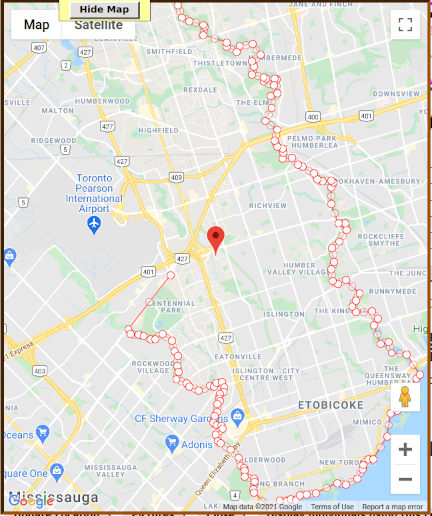
If the location represents a geographical region, such as a township, county, state, province, or country, then the boundary of the region should be defined. Identify successive points around the boundary of the region and click on them. Go clockwise around the region. Do not close the boundary; leave the last side open; the application closes the polygon by drawing a straight (constant compass heading) line from the last point to the first point when the boundary is displayed to visitors. In the displayed example for the township of Etobicoke note that the application draws this closing line from the end, just below Pearson Airport, up to the first point, on Steeles Avenue.
If you observe that a point on the boundary has been misplaced, you can drag that point to the correct position with the mouse. You can also insert a new vertex between two existing positions by grabbing the dot at the middle of the line between them. Remember that clicking anywhere on the map adds a new line segment to the boundary starting at the current last position and going to the point you click. There is currently no method for deleting a vertex from the list, only for dragging it to a new position.
If you click the mouse anywhere on the map the application adds a new point to the boundary after the last point. This is convenient when creating a boundary in the first place but may not be desirable when updating an existing boundary.